Orchids are among the most popular houseplants in Europe and enchant with the intense bloom and the rich green of the leaves. If the substrate is right, orchid plants require little care and bear fresh leaves every year. However, every now and then a mistake can happen during care that turns the leaves yellow and causes brown spots on the orchid. Different causes may be the case, which should be treated immediately.
Contents
Causes
Important in orchid care are proper substrate, fertilizing, watering and light. Due to their hardy nature, it takes quite a long time for the orchid to develop yellow leaves or brown spots, which indicates a severe imbalance in the plant’s nutrient balance. A variety of causes can be found, all of which need to be treated differently.
- Waterlogging
- Excess lime
- Drought
- Excess sun
- Overfertilization
- Pests
Please note, if your orchid has yellow leaves, you should never cut off the leaf or the tips. The risk of infection via the cut surface is too high and will further harm the orchid.

Waterlogging
Eliminate waterlogging
When orchids have been overwatered or drowned for some other reason, the leaves turn yellow. This is because the roots need to dry out a bit every now and then to prevent the roots from rotting. If the roots rot, the absorption of moisture and nutrients is inhibited and the plant can only grow to a limited extent. As a result, the leaves turn yellowish. You can recognize waterlogging by a substrate that is too wet and often the orchid can only be saved by fresh substrate. Depending on the type of orchid, a typical orchid substrate or ordinary soil is used. Renew the substrate as described below.
- Remove the plant from the substrate
- Rinse the roots
- Cut off rotten roots with sharp, disinfected knife or scissors
- fill dry pot with substrate
- let the roots dry a little before putting them in the pot
- then place them in the substrate
- fill in the remaining substrate and fix it carefully
Once you have repotted the orchid, do not water it, but spray it regularly for the first two to three weeks. Likewise, do not use fertilizer for the next two weeks. If you have an earth orchid, a drainage system can also be integrated into the pot.
Tip: Dip the root ball of the soil in low-calcium, soft water about every two weeks. This allows the roots to soak up water and they do not need to be watered for a long time, which is extremely good at preventing waterlogging.

Dryness
Do not let dry out
Even though too much water is not good for the orchid, it should not dry out either. The moth orchid Phalaenopsis, for example, so popular in Europe, is one of the classic tropical orchids and requires very little water, but watering should never be forgotten. If an orchid is too dry, three symptoms will show up in the following order.
- plant material becomes soft, slightly rubbery
- Leaves turn yellow
- Leaves turn brown in places
Soft plant material is not always noticeable because not everyone examines their orchid with their hands every day. Therefore, for many people, the dryness is not noticeable until the leaves turn color. If the leaves turn brown, the plant is dying of thirst and needs moisture immediately. The best solution to this is to carefully lift the plant out of the substrate followed by a soak in soft water. Let the orchid sit in the immersion bath until all air bubbles have disappeared and the roots, which are white at this point, have returned to a green color. Repeat this procedure every two weeks.
Note: If the humidity in the room is too low, the plant may also dry out. For this purpose, lime-free, lukewarm water is administered daily via a spray bottle.
Harmful excess lime
Orchids are not good with lime due to their natural habitat and this causes the roots to stop absorbing nutrients from the fertilizer. This is followed by yellowing of the leaves with subsequent brown spots. An excess is only possible if you use the wrong fertilizer or tap water with a high content of lime, which is typical for Europe. Therefore, from this point on, you should use only soft water. This can be obtained as follows.
- collect rainwater
- use a water filter
- filter water with peat
- boil water and let it cool down
Now you can fertilize again without any problems and the lime is slowly washed out of the substrate and dissolved. The orchid can thus again absorb the nutrients from the fertilizer and recover over the next few weeks.
Fertilized too much – discoloration follows.
As is known, orchids require a special fertilizer designed for the needs of the plant. Conventional fertilizers for flowers and other plants contains too high concentrations of salt, organic fertilizer is recommended only for terrestrial orchids because of the substrate. Many newcomers to the field of orchids make the mistake of using the wrong fertilizers or too high amounts of concentrate. Here it is recommended: less is more! Orchids require little preparation and can even withstand long periods without fertilizer. If yellow leaves with brown spots appear, the suspicion of overfertilization is obvious. Then you should proceed as described below.
- remove the orchid from the substrate
- look at the roots and remove all rubbery strands that have a black or brownish coloration
- be sure to leave the other roots in place
- rinse the roots thoroughly
- prepare new substrate
- place the plant in the fresh substrate
Do not fertilize until the next season!
By this measure, the orchid plant can again absorb enough fertilizer in the coming season, but is stilled for the entire season due to overfertilization. Also, watch out for the following typical mistakes when fertilizing.
- never put fertilizer directly on the substrate, but in the irrigation water
- always use less fertilizer than prescribed, unless it is high-quality, special natural fertilizers such as the guano preparations from Neudorff
- add some algae extract to the water to help the stressed roots to recover
Sunburn
The sunburn in detail
Orchids are tropical plants, but this does not mean that they can tolerate direct sunlight for hours. Often owners place their specimens in the blazing sun and wonder why the leaves turn yellow and sickly brown. Immediately change the location of the plant if sunburn is suspected. You can also recognize this by extremely dry leaves in this discoloration. A bright location with little direct sunlight over midday is ideal for the orchid. Then spray daily with lukewarm water or install a humidifier near the flower.
Pests
Pests drain the vitality
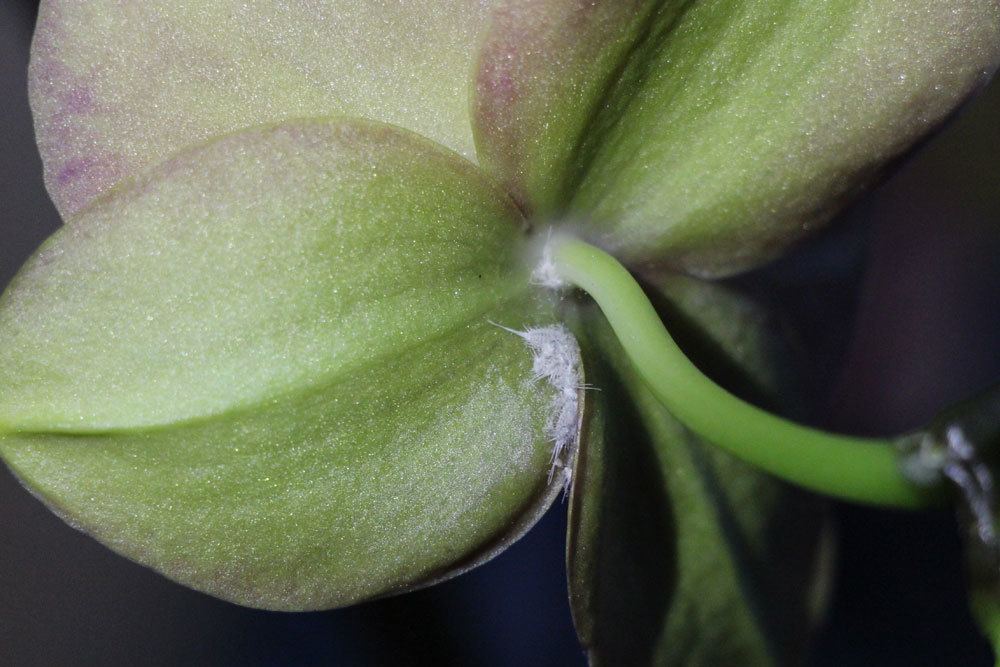
Orchids are hardy, but even against pests it can not do anything without proper care. Among the main pests of the plant, which are often responsible for yellow and brown leaves, are mealybugs and mealybugs. These are found on the shoots and leaves of Orchidaceae and feed on the plant juices that the plant needs to survive. During infestation, the pests continue to multiply rapidly and compound the problem. They can be identified by the white fuzz they weave around themselves for protection. Use the following means to remove the pests.

- wet a cloth with alcohol and wipe the plant
- dip a cotton swab in alcohol and dab the mites off
- put the orchid in a plastic bag for two to three days to cut off the mites’ oxygen supply.
If you are lucky and the mites are no longer visible, you can also rinse the orchids with water daily to protect them from additional infestation.


